Average Reviews:

(More customer reviews)Product arrived in excellent condition, Jacked and blocked up vehicle, removed front wheels. Removed brake caliper and wired up out of the way, removed 15 mm nuts from upper mount on top of inner fender under the hood. Removed 21 mm nuts and drove out the bolts from the lower suspension with the hammer and punch.
Removed the old strut assembly (DO NOT TAKE APART, under Severe Spring Tension)!! Make sure lower suspension arm doesn't drop too far when removing the old strut and be careful of the brake line, brake hose and ABS sensor and wiring.
Install new quick strut assembly per the instructions that comes with them, top first, then lower end. May need to move lower suspension up or down to align strut to get the lower mounting bolts in. Use alignment punch in one of the two holes to get one bolt in (use caution and don't flatten bolt threads), then put the second bolt in.
Tighten bolts and torque the nuts.
Tools need are floor jack, safety jack stands or blocking, 15mm socket and ratchet, 21mm deep socket and ratchet or 1/2" drive air impact wrench, hammer, alignment or drift punch 1/4" or 3/8" diameter by 6" long, and torque wrench (not necessary but good idea to torque the nuts to proper specs for upper mount nuts and lower suspension bolts.
Reinstall the brake caliper, mount the wheels and torque the lug nuts, remove safety stands and put vehicle down.
Took about an hour a side to change both front quick struts.
Easy job actually. First time I've done it and would highly recommend the Quick Strut for the do-it-yourself mechanic.
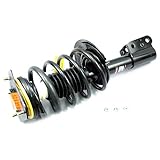
Click Here to see more reviews about: Monroe 171661 Quick-Strut Complete Strut Assembly
 Get 42% OFF
Click here for more information about Monroe 171661 Quick-Strut Complete Strut Assembly
0 comments:
Post a Comment